The Process Mobile Device Data screen allows you to select data for acceptance into the Rosistem Assets database (on the PC) and to correct errors on data before it is entered into the database. This data has previously been collected from one or more mobile devices via synchronization.
![]() If the Automatic Process Mobile Device Data option is turned off (Administration > Options > Automatic Process Mobile Data), the Process Mobile Device Data screen function must be manually accessed following synchronization of mobile devices. You will always see a message that informs you that there are unprocessed data and transactions from the mobile device after you sync the device (Windows Mobile/CE).
If the Automatic Process Mobile Device Data option is turned off (Administration > Options > Automatic Process Mobile Data), the Process Mobile Device Data screen function must be manually accessed following synchronization of mobile devices. You will always see a message that informs you that there are unprocessed data and transactions from the mobile device after you sync the device (Windows Mobile/CE).
![]() If the Automatic Process Mobile Device Data option is turned on (Administration > Options > Automatic Process Mobile Data), you will only have to manually access the Process Mobile Device Data screen when the system alerts you that there are unprocessed data. Usually, all data will be entered into the database automatically. If the message does not appear, all data was successfully entered into the database. You will only receive this message if there were errors on some of the information that you need to correct.
If the Automatic Process Mobile Device Data option is turned on (Administration > Options > Automatic Process Mobile Data), you will only have to manually access the Process Mobile Device Data screen when the system alerts you that there are unprocessed data. Usually, all data will be entered into the database automatically. If the message does not appear, all data was successfully entered into the database. You will only receive this message if there were errors on some of the information that you need to correct.
1.To access this function, from the Main screen, click Mobility > Process Mobile Device Data.
2.Upload Selection is the first screen presented:
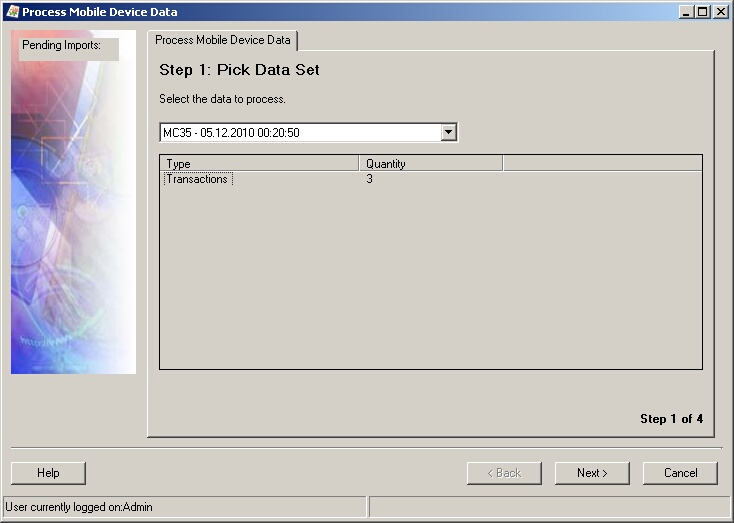
3.Use the Upload Selection screen to select one of the unprocessed sets of data that has been downloaded from a mobile device. These are named as that shown above - with the User ID, date and time. Each of these files was created on the PC when a mobile device synchronization was performed. There may be several files in the list, depending on how many mobile devices you use and how often you do this step to process accumulated files.
Select the oldest file in the drop down list and process those transactions first.
4.Click Next to continue to the New Records form:

5.In this example, the New Records screen lists two new assets created on the mobile device. You can accept or reject each of them by clicking the checkbox or double-clicking the record itself to toggle its selection status (between ![]() accepted and
accepted and ![]() not accepted). If the new data was created in error, you can also assign an existing value to take its place:
not accepted). If the new data was created in error, you can also assign an existing value to take its place:
The New Records toolbar has the following functions:
![]() Select all transactions in the list for Acceptance.
Select all transactions in the list for Acceptance.
![]() De-Select transactions in the list.
De-Select transactions in the list.
![]() Assign an existing value instead of creating a new record
Assign an existing value instead of creating a new record
6.Click Next > to continue to the Transactions screen. This screen displays all transactions (moves, check-ins, check-outs, audits)
7.Just as with the New Records screen, mark the transactions you wish to Accept by clicking the checkbox or double-clicking the record itself. Here, we have three transactions that have been Accepted. Each transaction completed on the mobile device is listed. Any ![]() errors or
errors or ![]() warnings are marked and you are allowed to accept or reject transactions or make changes to fix errors.
warnings are marked and you are allowed to accept or reject transactions or make changes to fix errors.
The Transactions toolbar has the following functions:
![]() Select all transactions in the list for Acceptance.
Select all transactions in the list for Acceptance.
![]() De-select transactions in the list.
De-select transactions in the list.
![]() Display Error (or Warning) associated with the highlighted record.
Display Error (or Warning) associated with the highlighted record.
The Error ![]() or Warning
or Warning ![]() message associated with the selected transaction will be displayed. Click Close to return to the Pending Transaction screen.
message associated with the selected transaction will be displayed. Click Close to return to the Pending Transaction screen.
![]() Records that have been previously processed will be marked with an Error
Records that have been previously processed will be marked with an Error ![]() flag.
flag.
![]() The Display Error toolbar button will be
The Display Error toolbar button will be ![]() grayed-out when no record with an Error
grayed-out when no record with an Error ![]() or Warning
or Warning ![]() symbol is highlighted.
symbol is highlighted.
Remember that the Palm cannot transact linked groups of asset as a whole, even if the Transact as Whole flag is selected for the parent asset. These types of transactions (moves, check-ins, check-outs, etc.) will appear on the Transactions tab with a warning icon. Click on the transaction and select the Error button to view the error message. You can go to the Edit screen of the parent asset on the PC and deselect the Transact as Whole checkbox, then return to this screen and proceed with processing the data if you do not wish to transact this group as a whole. If you do wish to continue processing the transaction for the entire group of linked assets, click Next on the Transactions screen to proceed. For more information on the Transact as Whole flag, please refer to the Palm PDA Add New topic.
![]() Edit Transactions allows you to make changes to the values specified at the mobile device.
Edit Transactions allows you to make changes to the values specified at the mobile device.
![]() Click OK to save any changes or Cancel to return to the Pending Transactions screen without saving changes.
Click OK to save any changes or Cancel to return to the Pending Transactions screen without saving changes.
7.Click Next > after you have selected which transactions to accept. The system will post the accepted transactions to the database.
8.Click Finish to close the Process Mobile Device Data screen.