The Add New User screen allows users assigned to the Admin Group to create new users who will have access to the system. The Edit User screen allows you to edit users you have already added to the database. These two screens are identical and function in the same way, so they are both discussed in this topic..
1.To Add/Edit Users:
To add a user:
1.a.From the Main screen, select Administration > Security > User Management. The User List appears.
1.b.On the User List, select the New button from the toolbar.
1.c.The Add New User screen appears.
To edit an existing user:
.b.From the Main screen, select Administration > Security > User Manager. The User List appears. This screen lists all users you have already setup in your system.
.c.Highlight the user you want to edit in the User List, then click the Edit button on the toolbar.
The example shown below is the Add New User screen. This is identical to the Edit User screen; however, the Edit User screen will be populated with the information of the user you selected in the User List.

2.The fields in bold on this screen are required.
oEnter information in the First Name, Last Name, and User Name fields. These fields are used for Logging On.
oAn initial Password and a Status. The user should change their password using the Change Password screen upon logging in. The Password field is masked for security reasons.
The Status is usually set to Active, meaning the user will be able to access and use they system based on his/her security settings. Inactive Users will show the text "Inactive" next to their names in the User List and will not be able to access the system.
Note on Creating Passwords:
A Password can contain any of the following characters:
oA - Z (uppercase & lowercase),
o0 - 9
·or any of these special characters: ` ~ ! @ # $ % ^ & * ( ) _ + - = [ ] { } | < > ? : ; . ,
oYou must assign this user to a Group. Groups are setup and managed from Administration > Security > Manage Groups. Each user must be assigned to a group.
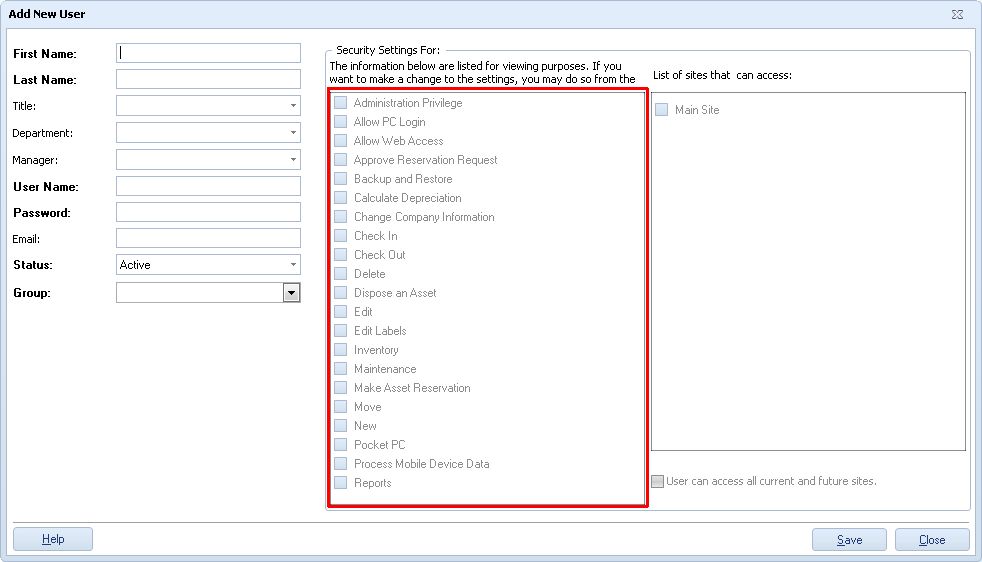
Note that after you chose a Group, the features and functions in Rosistem Assets to which the user will have access will display in the Security Settings > Privileges section. The Privileges settings cannot be changed on a per user basis. If you want to customize the settings for a user (by allowing one supervisor access to reports, while other supervisors do not have this access, for example), then you will need to create a new Group with the desired privileges and assign it to that user.
Below is an example of the Security Settings > Privileges section:
In addition, the sites to which this Group has access will appear in the List of sites this <Group> can access section. You can change the sites as needed by selecting or deselecting the checkboxes next to the site names. If this group is set to have access to all sites (set on the Manage Groups screen), then the User can access all current and future sites checkbox will be selected and you will not be able to select or deselect sites from this screen. An example of the Site section with the User can access all current and future sites checkbox highlighted is displayed below:
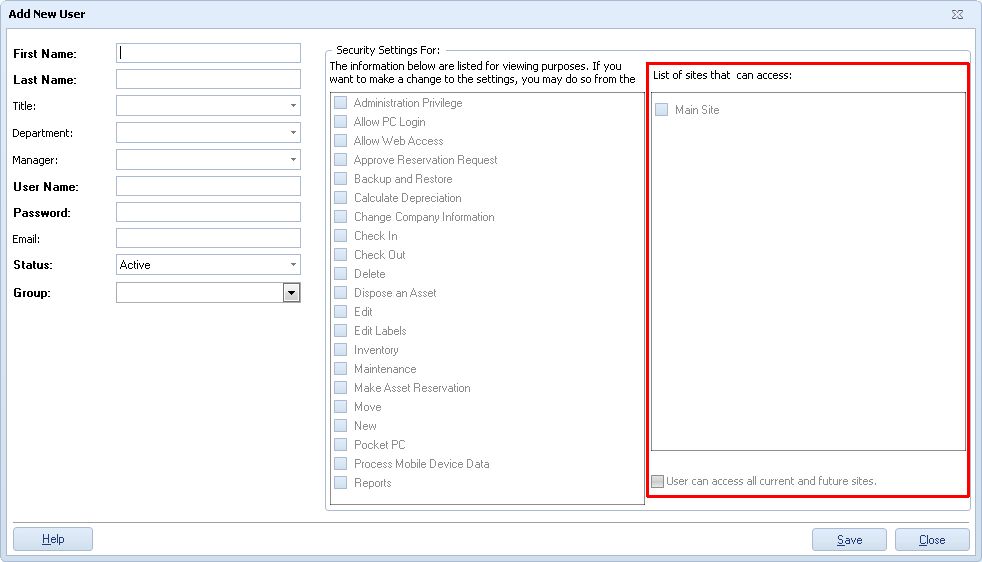
In this example, the User can access all current and future sites checkbox is not selected so you can select/deselect sites as needed for this user.
oYou may optionally enter information in the Title, Department, Manager, and Email fields.
3.Click OK when you have finished entering information on this screen.
Note: If you intend to define only one new user other than the default Admin account, we recommend you set that user up as an Admin as well.