User security in Rosistem Assets is set up by Group. A Group is a collection of security settings that one or more users share. You will need to create your Groups first, then add users and assign them to Groups. Before setting up your groups, take some time to think about the types of employees you have, who will need access to the software and what features/functions they will need to use in the software. You will want to create a Group for each different type of user you may have. You may need a Group for Managers, who have access to all Sites, Reports, Auditing, etc. Another group might be Supervisors who only need access to Reports and basic functions such as check in/out, but don't need access to Auditing. A third Group may be comprised of warehouse workers who need access to the mobile devices, but don't need to be able to log on to the PC.
For example, your company may have 5 supervisors who all need access to the same functions in the software. Instead of setting up each user and assigning these functions individually, you will enter the basic user information, then assign that user to a Group. The security access is then automatically assigned to the user based on the Group settings.
Keep in mind that changes you make to a Group, such as assigning new security privileges, will affect all users assigned to that Group.
You can give a group access to all companies or you can give select members of the group access to a company. Remember that all members assigned to the Group in the Active Directory will have the rights assigned them in the matching Rosistem Assets Group. If there are some people listed in the Active Directory group that you do not want to have the same rights, you will need to edit the Group in the Active Directory or create Groups and Users manually in Rosistem Assets. Creating the Groups and Users manually means you will lose the ease of auto created user accounts.
The topics covered in this section are:
Group Security Roles Screen Overview
Group Security Roles Screen Overview:
1.From the Main screen, click Administration > Security > Group Manager.
The Group Security Roles screen appears:

This screen lists any Groups that you have previously created, plus the default Admin group. Note that Admin has access to all features/functions and to all Sites.
You can view the Security Privileges and Site Privileges of a Group by selecting that Group in the list.
From this screen you can Add a Group, Duplicate a Group, Delete a Group or View the User List.
1.Click the Add a Group button on the toolbar. The Group Security Roles screen appears with a new entry in the Group List and the privileges fields appear blank as shown below:

2.Enter a Group Name and a Description for this group.
3.Now you can select the features to which the users assigned to this Group will have access. Select the checkbox next to the features you want to add to this Group. You can select individual features or choose the Select All button to select all features in the list. Click Select None to prevent this Group from having access to any features in Rosistem Assets.
4.Next you can select the Sites to which this Group will have access. You have two options in this section. You can select one or more Sites using the checkboxes. This gives the Group permission to access those Sites, and also allows you to select or deselect Sites on a per user basis (on the Add New User screen). You can select individual Sites or choose the Select All button to select all Sites in the list. Click Select None to prevent this Group from having access to any Sites.
OR
You can select the User can access all current and future sites checkbox. This disables the Sites on this screen and on the individual user's screens. Selecting this option means users in this Group will have access to all current Sites and any future Sites you may add.
5.When you have finished making your selections, click the Save button.
If you want to use most or all of a Group's settings for a new Group, you can create a copy of the Group, then add a new name and description. To do this:
1.On the Group Security Roles screen, select the Group you want to duplicate, then click the Duplicate button on the toolbar. The screen appears populated with the selected Group's settings, but with the Group Name and Description fields blank.
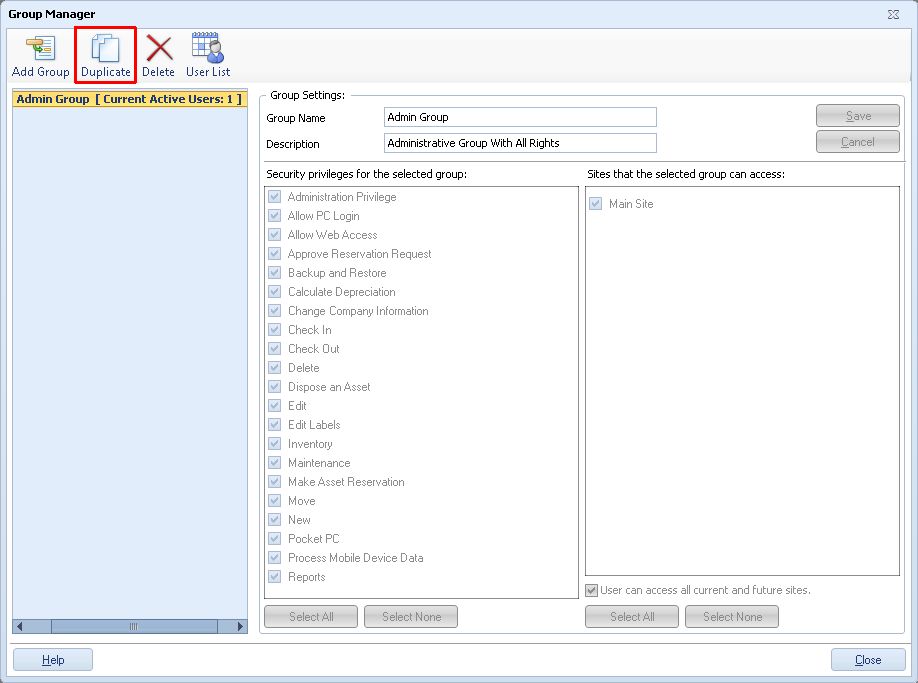
2.Enter a new Group Name and Description, then select to which sites this user will have access. You can also modify any feature or Site privileges as needed.
3.Click the Save button when you are done making changes. The new Group will be added to the list.
Note: Groups with users assigned to them cannot be deleted.
1.On the Group Security Roles screen, select the Group you want to delete, then click the Delete button on the toolbar. The confirmation screen shown below appears:
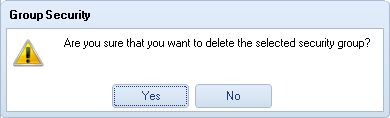
2.Click OK on the confirmation screen. The Group will disappear from the list.
1.On the Group Security Roles screen, click the User List button. The User List will appear.