The software contains several list screens that enable you to quickly view and access a variety of information. Available list screens are:
•Assets •Asset Types •Contracts •Customers •Departments •Depreciation Classes |
•Employees •Locations •Manufacturers •Sites •Transactions •Vendors |
Note: These screens all function the same; however, individual options may vary for each screen. This topic covers how to use all functions available on the list screens. Keep in mind that not all list screens contain all functions mentioned here.
Below is an example of the basic list screen layout. This is an example of the Asset List, the list screen you will probably use most often. This list screens are divided into three sections (labeled A through C in the example below):
A. Menu Bar
B. Toolbar
C. Contents List
D. Buttons
In addition to these menus there are also "Context-Sensitive Menus" that appear when you right-click on certain areas of the screen. These provide another way to access many of the functions available in the toolbar. These types of menus are also discussed later in this section.

Quick Links:
Click a link below to jump to that section of the topic:
The menu bar appears at the top of the screen and provides access to two menus:
Tools - Accesses the Reset All Grid Settings function. This option is found at the top of all lists. Select this option to reset all lists to their default settings. All filters, rearranged columns, group settings, etc. will be reverted to their default statuses.
View (Asset List Only) - The View menu option allows you to filter what assets display in the list. Options are:
•Linked Assets Only - Displays only Linked assets
•Unlinked Assets Only - Displays only assets that are not linked to other assets.
•Top Level (linked) Assets Only - Displays only "Parent" assets, not the assets associated with them.
•Top Level (all) Assets Only
•Disposed Assets - Displays all assets that have been marked as Disposed.

The toolbar at the top of the list screen provides quick access to a variety of functions and also allows you to customize how the information on the list is displayed. Keep in mind that if the >> icon appears in the toolbar of your list, there are hidden icons.
Re-Ordering Icons - You can re-order the icons contained in the toolbars. For example, you can move the Magnifying Glass icon (access the Filter function) from the far left position on the toolbar to the far right position. To do this:
1.Press and hold the ALT key on your keyboard,
2.Click on an icon and drag it to a new position on the toolbar.
Displaying Hidden Icons - If the list contains too many icons to display at one time you will see a double arrows icon in the top right corner of the toolbar as shown below:

Click on the double arrows to display the hidden icons:

Each of the functions available on the toolbars is described below:
Button |
Description |
|
Filter - Accesses the Find screen allowing you to quickly enter information to narrow your search. For more information on the Find screen, please see the Simple Find help topic. |
Toggle Filter - Once you have entered a filter on the Find screen, the list results will be limited to the information you entered. You can click on the Toggle Filter button to revert back to seeing all of the list items. Click it again to reapply your filter. |
|
|
New - Accesses the New screen allowing you to enter a new Asset, Asset Type, etc. |
|
Edit - Assesses the Edit screen allowing you to update and change information. |
|
Dispose or Delete - This icon is called Dispose on the Asset List. It allows you to Dispose of the selected item in the list. For more information on the Dispose transaction, please see the Dispose help topic. This icon is called Delete on other lists. It allows you to delete selected items in the lists. |
|
Duplicate - Allows you to copy the information from the item selected in the list to a new item. |
|
Mass Update - Rosistem Assets allows you to select multiple Assets from the Asset List and update a number of fields. For example, if you want to update warranty information for all Assets under a certain Asset Type, you can select all of those assets on the Asset List and make the change at one time. For more information on the Mass Update transaction, please see the Mass Update help topic. |
|
Check In- Accesses the Check In screen allowing you to check in an asset. For more information on the Check In feature, please see the Check-In help topic. |
|
Check Out - Accesses the Check Out screen allowing you to check out an asset to an employee or customer. For more information on the Check Out feature, please see the Check-Out help topic. |
|
Move - Accesses the Move screen allowing you to move one or more assets from one location to another. For more information on the Move feature, please see the Move help topic. |
|
View Linked Assets - If you are using asset linking, highlight a listing, then click the View Links button to view the parent asset and any children. Below is an example of the View Linked Assets screen.
Notice that in this example the asset that was highlighted in the Asset List appears highlighted on the View Links screen (asset 123 in this example). The parent asset appears at the top. If asset 123 had children linked to it, those would also appear on this screen. There is a toolbar at the top of this screen allowing you to perform actions on the assets on the screen. These functions are listed below: •Create New •Edit •Dispose •Copy •Check In •Check Out •Move |
|
Print - Allows you to print the list. When this button is selected, a standard Page Setup screen appears allowing you to enter margins. An example of this screen is shown below:
Click the OK button on the Page Setup screen to print the list. The list will print to your default printer. To change which printer the list is sent to, click the Printer button on the Page Setup screen. A Printer selection screen similar to the one shown below appears:
Choose your printer from the drop down, then click OK to return to the Page Setup screen. |
|
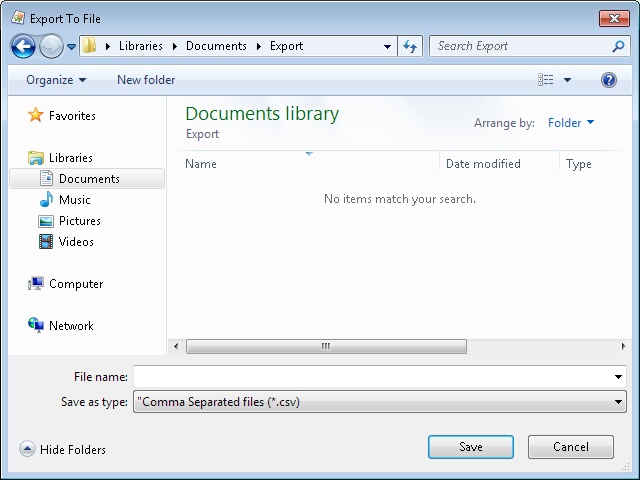
Export - Allows you to export the entire asset list to a comma-delimited text file. What is a comma-delimited file? When the Export button is selected, a screen appears allowing you to specify where the exported data will be saved on your computer. An example of the Export screen is shown below:
Make sure you save this to a location you can remember. You must also choose a name for your file on this screen. After you have made your selections, click Save to export your data. A confirmation message will appear when your data has been successfully exported by the system. |
|
Display/Hide Group Selections - The list screens provide you with the capability of "grouping" the displayed information so you can view data in a way that is most easy-to-read for you. You can have one group, two groups, or many groups depending on how you want to view your information. For instance, if you want all assets on the Asset List to be displayed grouped by location, you can quickly set this up. To see the grouping options, click the Display/Hide Group Selections button. The top of the list screen expands to display the group selections as shown below:
Creating Groups 1.To create a new group, click on a column header, then drag it to the space indicated on the screen. For example, if you want to group information by Site, click on the Site column header and drag it to the indicated space.
2.The screen now lists Site as one of your groups and the sites are grouped according to what Site they are assigned.
3.You can create additional groups to further organize your information by continuing to drag and drop column headers.
4.By default, the groups list information in ascending order. You can change this to descending order by clicking on the group name. Notice that after you click on the group name, the arrow next to the name is now pointing in the opposite direction and the information on the screen is reorganized.
Deleting Groups 1.If you no longer want to display information in a particular group you can easily ungroup the data. For instance, if you have created a group for Site and another for Location, but now wish to only group by site, you can remove the location group by clicking on the group name and dragging it down into the column header section. Let go of your cursor anywhere in the column header section and the group disappears.
2.The information contained in that group still appears on the display screen, but it is no longer grouped together.
|
|
Print Tags/Labels/Badges - This button is available on the Asset, Employee, Location Lists only. This option allows you to print barcode labels for any assets, employees, etc. selected in the list. Note: You must select a Label Printer prior to printing tags from the List screens. To Print Tags/Labels: 1.Click the Print Tags button on the toolbar. The following screen will appear:
2.Click Print button and the print dialog screen is shown as below window.
3.Click the OK button. |
|
Show Hidden Columns - The list allows you to hide columns by right-clicking on a column label and selecting Hide Column. This enables you to hide information you do not usually need. You can quickly view the columns you have hidden by clicking the Show Hidden Columns button. A popup screen similar to the one below appears listing all columns that are not currently visible.
You can return these columns to the full List screen by clicking on a listing in the Hidden Columns screen and dragging it back to the column labels section on the List screen.
When you hide a column, it will remain hidden until you manually return it to the List screen by following the instructions above.
|
Views - This icon allows you to save your list settings, including any filters (search criteria), group settings, reordered columns, etc. Click on the icon arrow to view available options for this feature, as shown below:
·Save/Save as - Accesses the Save View screen allowing you to name and save list settings. ·Delete - Click the arrow to view a list of views. To delete:
.a.Select Views > Delete. A list of all saved views appears. .b.Click on the filter you want to delete. .c.A confirmation message similar to the one below appears:
Click Yes on the confirmation message.
·Load -This option allows you to apply a saved view to the list.
To load a saved filter: .a.Select Views > Load. A list of all saved views appears. .b.Click on the view you want to apply:
.c.The selected view will be applied to your list.
|


The contents list displays all data related to the selected list. For example, if you selected the Asset List, all assets will display here, if you selected the Locations list, all locations will display here, etc.
Sorting Columns: Most of the columns that appear in the lists can be sorted ascending or descending. The columns sort ascending by default. To change the sort order, click on the column heading. An arrow will appear next to the column name to let you know in which direction the information is sorted. The example below shows the Site column sorted Ascending.
Selecting a Listing: The list screens can display up to 1000 lines of information at a time (for further information on setting the row limit, click here). You can quickly scroll through the listings, or view columns that are hidden from view by using the buttons directly below the contents list. Keep in mind that you can also use the Display Hidden Columns button to view columns that are normally hidden (see Section A: Toolbars, above).
You can click on a listing to highlight it, then click the button that accesses the desired function.
Selecting Multiple Listings: You can select multiple listings at a time by holding down the Ctrl and clicking the listings with your mouse. Multi-select can be used for Deleting items, the Mass Update feature and Maintenance.
Arranging Columns: You can arrange the columns in the list into any order you wish. To change the order, click on a column heading and drag it somewhere else on the list.
Section D: Buttons and Status Bar

This section contains the following:
Help - Click this button to access this help document.
Close - Click this button to close the list. Keep in mind when closing the list that your groups and column settings will be retained.
Status Bar - The bar at the bottom of the screen indicates what filters you currently have set for the list.
The software provides you with a toolbar for quick access to various list features and, in addition, many of these features can also be accessed via "context-sensitive menus". By right-clicking on a column heading, a list of available features appears, as shown below:
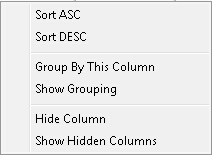
These features allow you to sort, group and hide columns in the list. Any changes you make to the list via this menu will be retained when the screen is closed and re-opened.