The Check-In transaction provides the ability to Check-In an asset that was previously checked out to a Customer or Employee.
1.To check-in an asset, from the Main menu, tap Check In. The Check-In screen appears:
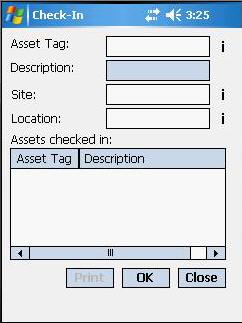
2.Entry of an Asset Tag is required. The value can be scanned in, searched for by tapping the appropriate ![]() symbol, or entered manually.
symbol, or entered manually.
If you are using asset linking, the system will check for the Transact as Whole flag. If the flag is turned on for this asset (or the parent of this asset), a message will appear notifying you. You can either leave the flag on to perform the transaction on the entire group of linked assets, or select to turn the flag off to perform the transaction only on this asset.
3.The Site and Location values will default to the location from which the asset was checked-out, but they can be optionally overwritten if you want to move the asset to a different Location concurrent with the Check-In. The ![]() symbols can be used to Search for a Site or Location to which you would like to affect a Move during Check-In.
symbols can be used to Search for a Site or Location to which you would like to affect a Move during Check-In.

4.Tap OK to add an Asset to the list of Assets checked in. Tap Print to print the list of Checked-In assets to a supported mobile printer or Close to exit the Check-In function.
![]() Rosistem Assets allows mobile devices to Check-In Assets that were not Checked-Out at the time the database was created for the mobile device. Later, when Process Mobile Device Data is performed, any discrepancies can be reconciled.
Rosistem Assets allows mobile devices to Check-In Assets that were not Checked-Out at the time the database was created for the mobile device. Later, when Process Mobile Device Data is performed, any discrepancies can be reconciled.
![]() For an overview of Asset Windows Mobile/CE device operations, see The Windows Mobile/CE Data Cycle.
For an overview of Asset Windows Mobile/CE device operations, see The Windows Mobile/CE Data Cycle.